Brush Tool
![]() The brush allows you to draw thick lines in any color or pattern of your choice.
The brush allows you to draw thick lines in any color or pattern of your choice.
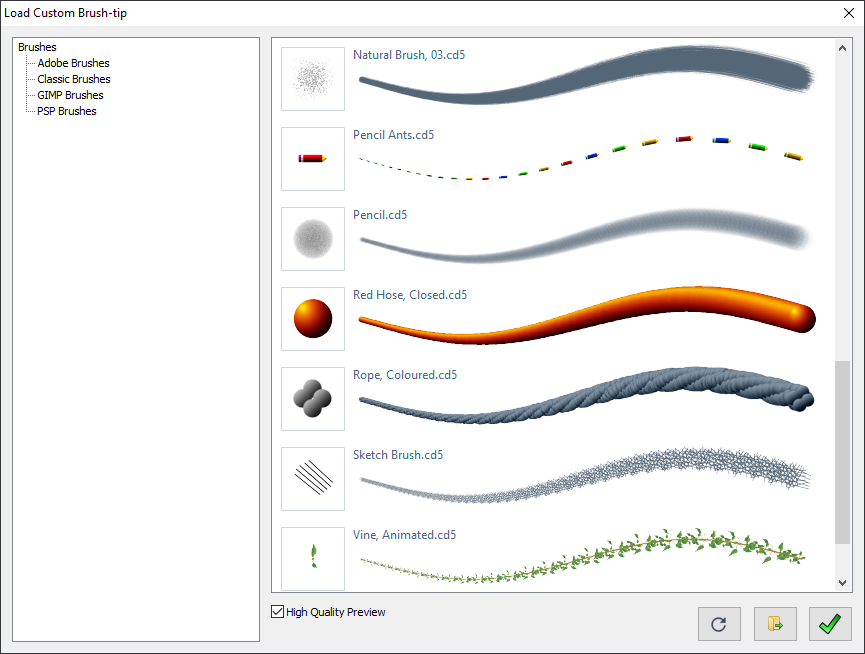
This tool can be operated with or without a brush object (i.e. a custom brush tip). To load a brush object, use the Brush option under the Objects menu, or click the brush gadget. This will bring up the custom-brush selection window, where you can pick your preferred brush:
 |
 |
You can use the toolbox to set the width, and, in the case of automatically spaced brush objects, the level. To draw using the first selected color, hold the left mouse button then move the mouse. To use the second color, use the right mouse button instead.
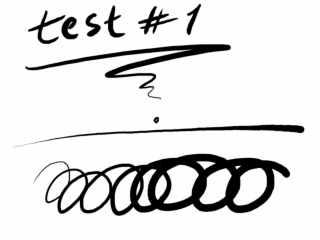
This tool is pressure sensitive when using a graphics tablet; the pressure varies the brush width as shown above.
| Options |
|---|
No Object: When used without a brush object, the brush tip is a simple circle. A line of zero width is taken to mean 1 pixel with anti-aliasing disabled.
The line
is drawn anti-aliased unless the brush-tip mode dictates otherwise.
|
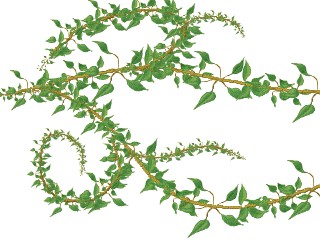
Object Loaded: If a brush object is loaded, the brush adopts the behavior set by that object. A brush object can have any color or shape, and may be designed to change shape as you draw. Such a changing brush is said to be animated. Consider the animated brush composed of the images shown below:
This brush can be used to draw an entire vine complete with branches; as the shape changes an element of randomness is introduced, making it look natural. Sizes can be changed for an even more realistic finish, especially if a graphics tablet is used:
Brush objects can also be used to draw seemingly random effects, such as smoke or clouds, as shown in Example 1 below. If you haven't tried that tutorial, please purpose to do so, it is very informative and easy to follow:
Please note the level changes the spacing between successive applications of the brush pattern if the spacing of the brush is set to auto. For more information about this option, see Objects - Brushes.
|


Custom Brush functionality is currently enabled through Brush Engine, which supports Chasys Photo brushes (.cd5), Adobe brushes (.abr) and GIMP brushes (.gbr;.gih).
Example 1: Painting Desert.cd5
From the menu, select File then New. Set the image size to 640 by 480 pixels. On the palette, left-click white then right-click blue. If you don’t have the palette on your screen, go to the menu Window and select Color Palette. This should set the current colors (shown by the current colors gadget, bottom-left of the main window) as shown:

On the toolbox, click the Gradient Fill tool button
![]() and select the color gradient, ellipse option (first column, second row).
If you don’t have the toolbox on your screen, go to the menu, select Window
then select Toolbox.
Confirm that the alpha#1 setting on the toolbox is set to
0 and the alpha#2
is also 0.
Move the mouse pointer to a point just above the center of the image and click the left mouse button.
Move the mouse pointer towards the bottom right of the image until the image is filled as shown, then click again to set the second point.
If you are not getting deep blue at the second point, check if alpha#2 is set to zero (0).
and select the color gradient, ellipse option (first column, second row).
If you don’t have the toolbox on your screen, go to the menu, select Window
then select Toolbox.
Confirm that the alpha#1 setting on the toolbox is set to
0 and the alpha#2
is also 0.
Move the mouse pointer to a point just above the center of the image and click the left mouse button.
Move the mouse pointer towards the bottom right of the image until the image is filled as shown, then click again to set the second point.
If you are not getting deep blue at the second point, check if alpha#2 is set to zero (0).
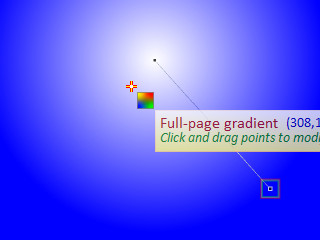
Note that you can move any of the points by using the left mouse button to drag. The selected (and currently dragging) point is shown highlighted; the highlighting is indicated by multi-colored rectangles as shown below. Experiment a bit by dragging the point is your image to familiarize yourself with using the dragging handles.
Once you have positioned the gradient properly, you can right-click (or press Enter) to apply. If you have trouble finding the center, you can bring up the Grids and Guides under the View menu) to help you.
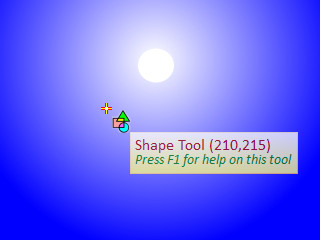
On the toolbox, select the Shape Tool ![]() .
This tool brings up a list of shapes to choose from. Choose the filled circle (second column, second row).
Using this, go back to your initial point, click then move the mouse until you get a reasonably sized "sun", then click again.
Note that you can use the mouse wheel to zoom in and out and to pan as you try to decide where to click
(see Preferences for details). Right-click (or press Enter) to apply when satisfied.
.
This tool brings up a list of shapes to choose from. Choose the filled circle (second column, second row).
Using this, go back to your initial point, click then move the mouse until you get a reasonably sized "sun", then click again.
Note that you can use the mouse wheel to zoom in and out and to pan as you try to decide where to click
(see Preferences for details). Right-click (or press Enter) to apply when satisfied.
There are many ways to do what we are going to do next, but I'll start with showing you the simplest. On the toolbox, select the Brush tool ![]() . Chasys Photo will normally bring up the brush selection dialog the first time you use this tool. If it doesn’t, go to the menu, select Objects, Brush, then Load from File. This is what you get:
. Chasys Photo will normally bring up the brush selection dialog the first time you use this tool. If it doesn’t, go to the menu, select Objects, Brush, then Load from File. This is what you get:
Please note that you can also get this option by right-clicking the brush gadget .
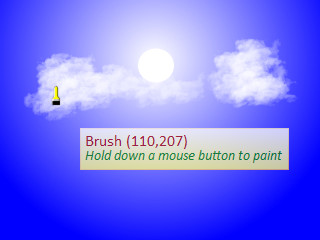
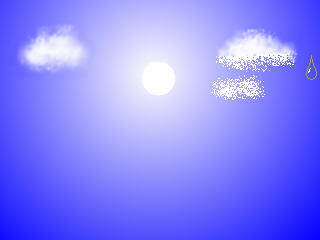
Now, select the “Clouds, Animated” brush. Confirm that the width setting on the toolbox is set to 100 and that your colors are still white and blue as set previously. Use the brush to do clouds as shown below by holding down the left mouse button and dragging. You may zoom in and out as needed using the mouse-wheel (see Preferences and Settings for details):
Please note that you can also draw clouds by using the Spray-gun option of the Roughen and Spray tool ![]() then smoothening out the results using the Smoother/Solvent tool
then smoothening out the results using the Smoother/Solvent tool ![]() as shown below:
as shown below:
Now that we are done with the sky, it’s time to do the ground-work (no pun intended). On the palette, left-click pale brown and right-click the strong brown so that you now have your colors now looking like this:

If you find difficulty in following the next three steps, try achieving the same
result using the Brush tool ![]() only. You may find it much easier to use, but the results may not be as good.
only. You may find it much easier to use, but the results may not be as good.
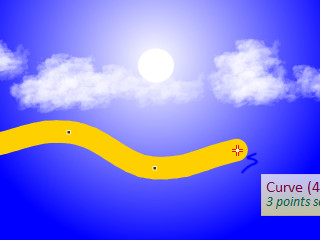
On the toolbox, click the Line and Curve tool ![]() then select the Curved option. A tool width of 32 wouldn't hurt. Left-click a point just outside
the image to the far left of the image, halfway from the top. Left-click the
point you want to be the top of the hill, then a valley, and proceed till you reach the far
right. Right-click to end the curve. Adjust the points if need be by dragging them with the left mouse button, then right-click again to finish.
then select the Curved option. A tool width of 32 wouldn't hurt. Left-click a point just outside
the image to the far left of the image, halfway from the top. Left-click the
point you want to be the top of the hill, then a valley, and proceed till you reach the far
right. Right-click to end the curve. Adjust the points if need be by dragging them with the left mouse button, then right-click again to finish.
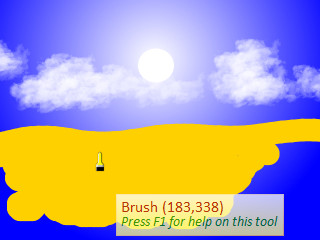
Once your are done, select the Brush tool ![]() . Find the brush gadget . Right-click it to bring up the brush menu. Select delete to remove the "clouds" brush we had loaded earlier. What you now have is a simple, round-tipped brush. Use it to fill the area below the curve you have
just drawn:
. Find the brush gadget . Right-click it to bring up the brush menu. Select delete to remove the "clouds" brush we had loaded earlier. What you now have is a simple, round-tipped brush. Use it to fill the area below the curve you have
just drawn:
Now for some perspective... At this point, I'll assume that you are now getting comfortable with the tools and are willing to experiment for yourself, so I'll let you do some exploring by giving you open-ended instructions.
On the toolbox, select
the GT Shape tool ![]() , and choose the vertical rectangle option (option 2). Now try doing this. If you make a mistake, just
select Edit, Undo from the menu or use the shortcut keys Ctrl+Z.
, and choose the vertical rectangle option (option 2). Now try doing this. If you make a mistake, just
select Edit, Undo from the menu or use the shortcut keys Ctrl+Z.
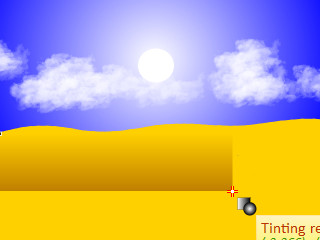
Remember to pull it to the very bottom, don’t leave it as shown on the picture.
On the toolbox, select the roughen tool ![]() . Use it to roughen the "ground" as
shown below:
. Use it to roughen the "ground" as
shown below:
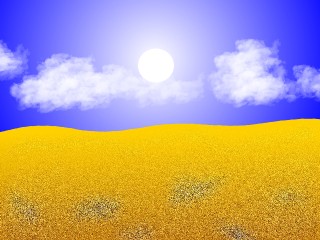
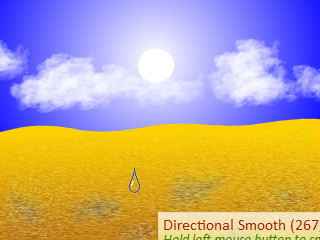
Now for the final step... On the toolbox, choose the Smooth tool ![]() , and choose the directional option (option 2).
Set the tool width to 50 pixels and try doing this (Hint: hold down the left
mouse button).
, and choose the directional option (option 2).
Set the tool width to 50 pixels and try doing this (Hint: hold down the left
mouse button).
You can now apply some finishing touches to the image...
 Select the Hand tool
 ![]() from the toolbox and use it to right-click the image for a list of options. Choose "Duplicate Layer".
from the toolbox and use it to right-click the image for a list of options. Choose "Duplicate Layer".
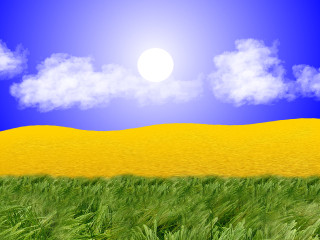
Working with this duplicate, select the Eraser ![]() tool from the toolbox, and use it to eraser the entire duplicate.
tool from the toolbox, and use it to eraser the entire duplicate.
Select the Brush tool ![]() , and load the "grass_animated" custom brush. Use this to paint in the grass. Your image should look something like this.
, and load the "grass_animated" custom brush. Use this to paint in the grass. Your image should look something like this.
Select the Gradient Fill ![]() tool and choose the Transparency Gradient option (option 3). Using this, make the top part of the grass transparent, with gradient towards opacity as you approach the bottom. Remember to set alpha#1 and alpha#2 appropriately (0 and 255).
tool and choose the Transparency Gradient option (option 3). Using this, make the top part of the grass transparent, with gradient towards opacity as you approach the bottom. Remember to set alpha#1 and alpha#2 appropriately (0 and 255).
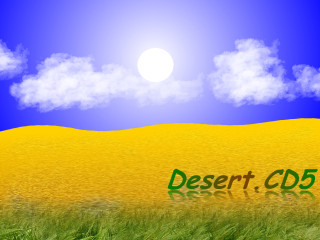
You can then add text using the TextArt ![]() tool. Just use the styling options provided in the TextArt dialog to decorate your text (I used the "reflection" render style).
tool. Just use the styling options provided in the TextArt dialog to decorate your text (I used the "reflection" render style).
That wasn’t so hard, was it? You are now familiar enough with the Chasys Photo Editor environment to start experimenting with the other tools. Happy drawing!